


JUnit5 & Mockito
1. 前言
Junit系列可以解决测试启动、测试状态校验与组织的问题,比如测试启动上有参数化测试、并发测试、顺序测试等功能,校验上有异常断言、超时断言等功能,代码组织上有测试分组、测试报告自定义等功能.
在上述领域之外,Mockito很好地承担了对测试对象打桩(stub)以及对测试行为校验的功能.有人可能所Mockito都不能mock私有、静态和构造方法,差评!(虽然要不要测试私有方法还没有定论那你可以从下面挑一款!
| 工具 | 原理 | 最小Mock Unit | 对被Mock方法的限制 | 上手难度 | 总结 |
|---|---|---|---|---|---|
| Mockito | 动态代理 | 类 | 不能mock私有、静态和构造方法 | 一般 | 比较全面就是不能mock方法有限制 |
| Spock | 动态代理 | 类 | 不能mock私有、静态和构造方法 | 较复杂 | 可读性好;mock上也有限制 |
| PowerMock | 自定义类加载器 | 类 | 都可以 | 较复杂 | Jacoco默认情况下不能统计覆盖率 |
| JMockit | 运行时修改字节码 | 类 | 不能mock构造方法 | 较复杂 | 目前不咋被维护 |
| TestableMock | 运行时修改字节码 | 方法 | 都可以 | 容易 | 思路清奇,指哪打哪,上手简单 |
这里也单独提一下TestableMock. 它绕开了传统Mock工具先mock对象的思路,直接修改运行时被调用的方法,而这只需用一个@MockInvoke注解即可.
然而Mockito只是方便开发者mock数据,却不能帮开发者把数据造出来,在复杂的业务场景下,如何快速生成有业务含义的对象或者响应体依然时很麻烦的问题.我们还需要一个工具方便我们从运行时获取依赖数据.
2. JUnit5 使用与原理
在JUnit4发布十年之后,2017年JUnit团队靠众筹推出了全新的JUnit5.
-
JUnit Platform: 在 JVM 上启动测试框架的基础,不仅支持 Junit 的测试引擎TestEngine,其他测试引擎也都可以接入。
-
JUnit Jupiter: JUnit Jupiter同时支持JUnit5新的programming model 以及老的Extension Model.Jupiter实现了自己的TestEngine。
-
JUnit Vintage: 为了向后兼容提供的TestEngine,支持运行JUnit4,Junit3的测试.注意类路径或者模块路径至少包含JUnit 4.12以以上版本.

虽然包括三个部分,不过最新版本引入org.junit.jupiter:junit-jupiter就可以了,核心注解都在org.junit.jupiter.api下.
2.1. 新的注解
下面按照我个人经验列举JUni5的新注解,更多的在这里:
| Annotation | 描述 |
|---|---|
| @Test | 和 JUnit4 的 @Test 不同,这个@Test不能声明任何属性,Jupiter会为不同的test extension提供专门注解 |
| @ParameterizedTest | 表示方法是参数化测试 |
| @RepeatedTest | 表示方法可重复执行,可配合并发测试 |
| @DisplayName | 为测试类或者测试方法设置展示名称,支持emoji😄 |
| @BeforeEach | 表示在每个单元测试之前执行 |
| @AfterEach | 表示在每个单元测试之后执行 |
| @BeforeAll | 表示在所有单元测试之前执行 |
| @After all | 表示在所有单元测试之后执行 |
| @Disabled | 表示测试类或测试方法不执行,类似于 JUnit4 中的 @Ignore |
| @Timeout | 表示测试方法运行如果超过了指定时间将会返回错误 |
| @Nested | 该注解允许在测试类中定义非静态测试类.@BeforeAll与@AfterAll不直接适用于@Nested测试类 |
| @TestClassOrder | 指定测试类的执行顺序 |
| @TestMethodOrder | 指定测试方法的执行顺序 |
| @ExtendWith | 为测试类或测试方法甚至字段提供一个或多个扩展环境 |
2.2. 新的特性
2.2.1. 超时断言
@Test
@DisplayName("超时测试")
public void timeoutTest() {
    //如果测试方法时间超过1s将会异常
    Assertions.assertTimeout(Duration.ofMillis(1000), () -> Thread.sleep(500));
}
2.2.2. 参数化测试
以下为部分介绍,更多细节在这儿.
2.2.2.1. 传入单个参数
-
@ValueSource: 为参数化测试指定入参来源,支持八大基础类以及 String 类型, Class 类型
-
@EmptySource: 提供空白数组或空白集合,支持八大基础类及它们包装类以及 String 类型, 集合类型
-
@NullSource: 表示为参数化测试提供一个 null 的入参
-
@EnumSource: 表示为参数化测试提供一个枚举入参
@ParameterizedTest
@ValueSource(strings = { "racecar", "radar", "able was I ere I saw elba" })
void palindromes(String candidate) {
    assertTrue(StringUtils.isPalindrome(candidate));
}
@ParameterizedTest
@NullSource
@EmptySource
@ValueSource(strings = { " ", "   ", "\t", "\n" })
void nullEmptyAndBlankStrings(String text) {
    assertTrue(text == null || text.trim().isEmpty());
}
2.2.2.2. 传入多个参数
- @MethodSource:读取静态方法的Stream流作为参数化测试入参
@ParameterizedTest
@MethodSource("stringIntAndListProvider")
void testWithMultiArgMethodSource(String str, int num, List<String> list) {
    assertEquals(5, str.length());
    assertTrue(num >=1 && num <=2);
    assertEquals(2, list.size());
}

static Stream<Arguments> stringIntAndListProvider() {
    return Stream.of(
        arguments("apple", 1, Arrays.asList("a", "b")),
        arguments("lemon", 2, Arrays.asList("x", "y"))
    );
}
- @ArgumentsSource: 读取实现了ArgumentsProvider接口的类中方法返回流作为入参
@ParameterizedTest
@ArgumentsSource(MyArgumentsProvider.class)
void testWithArgumentsSource(String argument) {
    assertNotNull(argument);
}
public class MyArgumentsProvider implements ArgumentsProvider {

    @Override
    public Stream<? extends Arguments> provideArguments(ExtensionContext context) {
        return Stream.of("apple", "banana").map(Arguments::of);
    }
}
2.2.2.3. 传入对象&大量数据(文件)
- @CsvSource:表示读取指定 CSV内容作为参数化测试入参
@ParameterizedTest
@CsvSource({
    "Jane, Doe, F, 1990-05-20",
    "John, Doe, M, 1990-10-22"
})
void testWithArgumentsAggregator(@AggregateWith(PersonAggregator.class) Person person) {
    // perform assertions against person
}
public static class PersonAggregator implements ArgumentsAggregator {
    @Override
    public Person aggregateArguments(ArgumentsAccessor arguments, ParameterContext context) {
        return new Person(arguments.getString(0),
                          arguments.getString(1),
                          arguments.get(2, Gender.class),
                          arguments.get(3, LocalDate.class));
    }
}
- @CsvFileSource:表示读取指定 CSV 文件内容作为参数化测试入参
@ParameterizedTest
@CsvFileSource(resources = "/two-column.csv", numLinesToSkip = 1)
void testWithCsvFileSourceFromClasspath(String input, int output) {
    assertNotNull(input);
    assertEquals(input, output);
}
2.2.2.4. 扩展
-
参数化测试相当于是合并了多个单元测试输入输出数据的"缩写",所以通常会有代表input和output的输入输出.当input都对应相同的output时,可以省略output.
-
通过外部文件作为参数构造文件,就可以将测试逻辑与准备数据充分解耦.具体实现除了官方支持的CSV ,想支持其他格式,如JSON/YAML
- 可以转成对应的CSV
- 自己从文件路径中读取文件,再转成Stream,通过
@MethodSource或@ArgumentsSource实现入参
第二种思路适用性更强,可参考笔者的实现。
2.2.3. 重复与并发测试
2.2.3.1. 重复测试
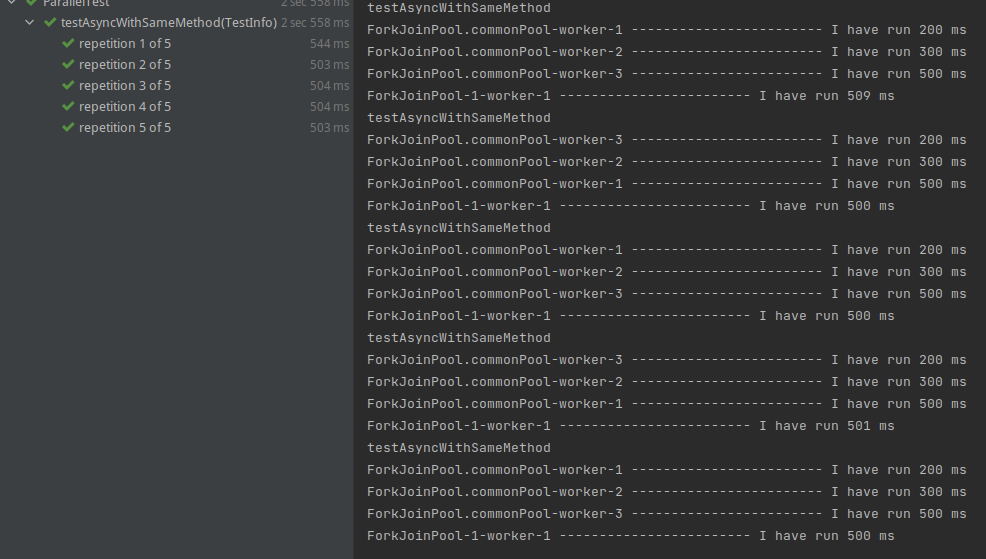
有人可能会疑惑什么时候能用上重复测试?一种情况是当方法重复执行输出或者函数副作用不同时,比如统计并发异步执行的方法最终耗时:
public class ParallelTest {

    void sleep200() {
        run(sleep(200));
    }

    void sleep300() {
        run(sleep(300));
    }

    void sleep500() {
        run(sleep(500));
    }

    private Runnable sleep(int during) {
        return () -> {
            try {
                Thread.sleep(during);
            } catch (InterruptedException e) {
                System.out.println(""+e);
            }
        };
    }

    private void run(Runnable runnable) {
        Instant start = Instant.now();
        runnable.run();
        Instant end = Instant.now();
        System.out.println(Thread.currentThread().getName() + " ------------------------ " +
                "I have run "+ Duration.between(start,end).toMillis() + " ms");
    }

    private void async() {
        run(()-> {
            try {
                allOf(runAsync(this::sleep200), runAsync(this::sleep300), runAsync(this::sleep500)).get();
            } catch (InterruptedException | ExecutionException e) {
                System.out.println(""+e);
            }
        });
    }

    @RepeatedTest(5) @Execution(ExecutionMode.SAME_THREAD)
    void testAsyncWithSameMethod(TestInfo testInfo){
        System.out.println(testInfo.getTestMethod().get().getName());
        async();
    }

}
2.2.3.2. 并发测试
并发测试很适合测试下游幂等。JUnit5中的并发执行测试可以分为以下三种场景:
- 多个测试类,它们各自的测试方法同时执行;
- 一个测试类,里面的多个测试方法同时执行;
- 一个测试类,里面的一个测试方法,在重复测试(Repeated Tests)或者参数化测试(Parameterized Tests)的时候,这个测试方法被多个线程同时执行;
以最后一种同一个类同一个方法多次执行的并发为例,需要在test/resources目录中加入junit-platform.properties:
# 并行开关true/false
junit.jupiter.execution.parallel.enabled=true
# 方法级多线程开关 same_thread/concurrent
junit.jupiter.execution.parallel.mode.default = same_thread
# 类级多线程开关 same_thread/concurrent
junit.jupiter.execution.parallel.mode.classes.default = same_thread

# 并发策略有以下三种可选:
# fixed:固定线程数,此时还要通过junit.jupiter.execution.parallel.config.fixed.parallelism指定线程数
# dynamic:表示根据处理器和核数计算线程数
# custom:自定义并发策略,通过这个配置来指定:junit.jupiter.execution.parallel.config.custom.class
junit.jupiter.execution.parallel.config.strategy = fixed

# 并发线程数,该配置项只有当并发策略为fixed的时候才有用
junit.jupiter.execution.parallel.config.fixed.parallelism = 5
然后再原本测试代码标记@Execution(ExecutionMode.CONCURRENT):
    @RepeatedTest(5) @Execution(ExecutionMode.CONCURRENT)
    void testAsyncConcurrently(TestInfo testInfo){
        System.out.println(testInfo.getTestMethod().get().getName());
        async();
    }
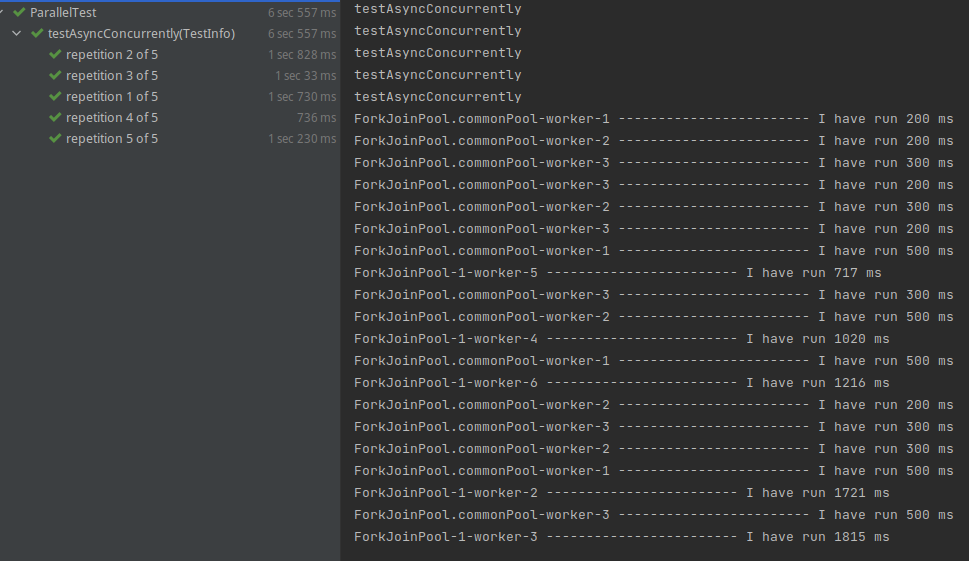
对比之前的结果,可以看到执行的乱序以及最开始确实有问题5个线程并发执行了这个方法,最后总时间1815ms也比起来500*5ms略少一些.
2.2.4. 对类中单元测试分组
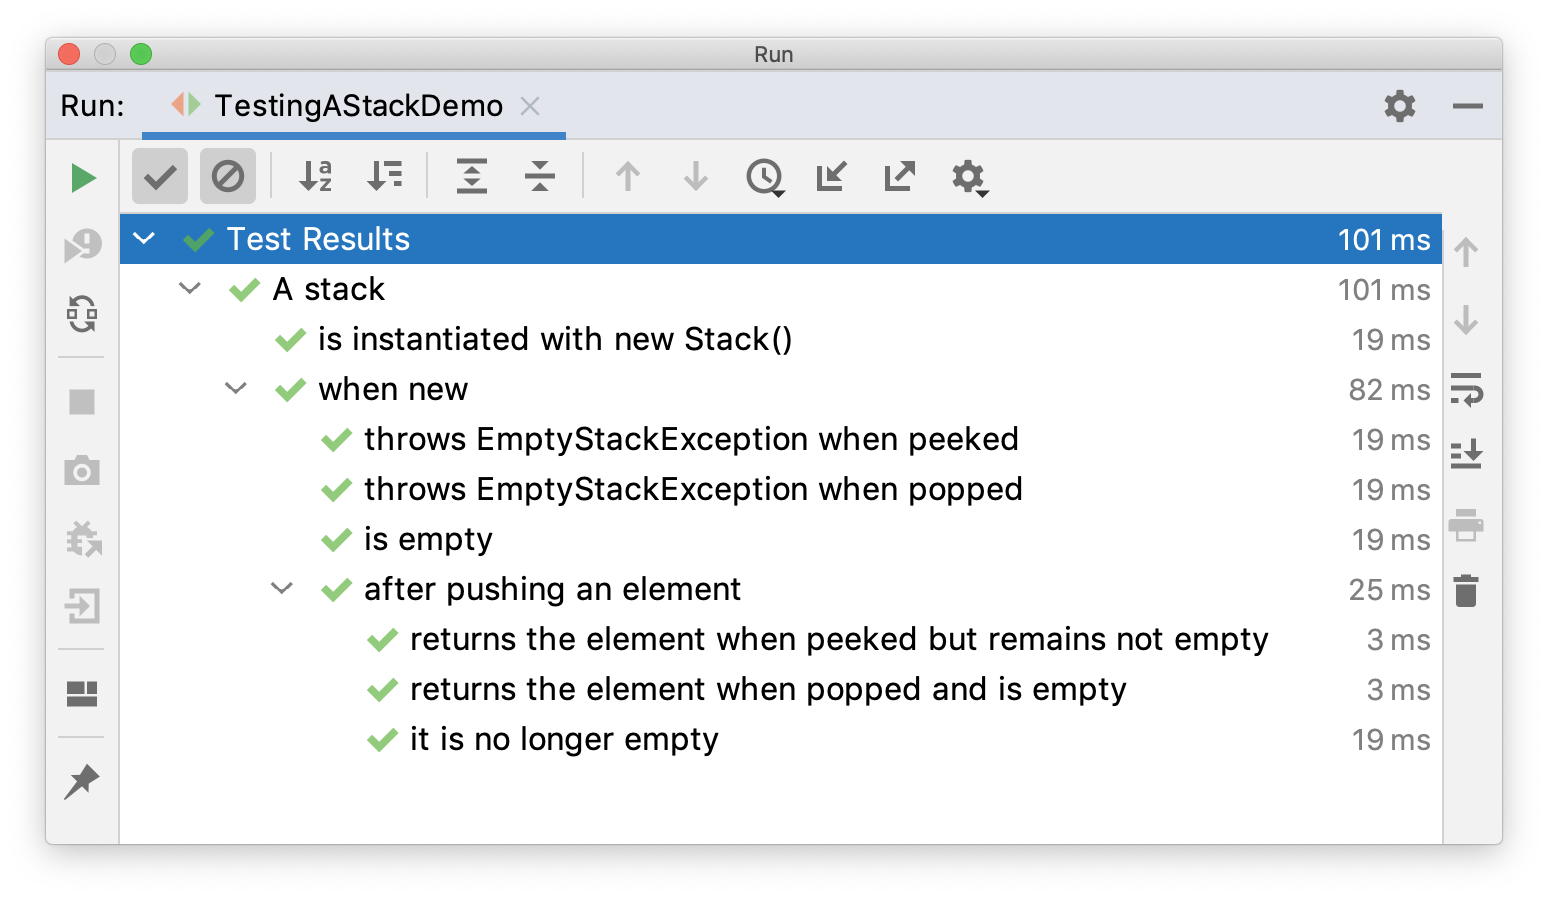
如果一个Service类中方法较多,单纯写单元测试也会很多.@Nested 可以允许以静态内部成员类的形式对测试用例类进行逻辑分组.\
下面是一个测试Stack功能的例子
import static org.junit.jupiter.api.Assertions.assertEquals;
import static org.junit.jupiter.api.Assertions.assertFalse;
import static org.junit.jupiter.api.Assertions.assertThrows;
import static org.junit.jupiter.api.Assertions.assertTrue;

import java.util.EmptyStackException;
import java.util.Stack;

import org.junit.jupiter.api.BeforeEach;
import org.junit.jupiter.api.DisplayName;
import org.junit.jupiter.api.Nested;
import org.junit.jupiter.api.Test;

@DisplayName("A stack")
class TestingAStackDemo {

    Stack<Object> stack;

    @Test
    @DisplayName("is instantiated with new Stack()")
    void isInstantiatedWithNew() {
        new Stack<>();
    }

    @Nested
    @DisplayName("when new")
    class WhenNew {

        @BeforeEach
        void createNewStack() {
            stack = new Stack<>();
        }

        @Test
        @DisplayName("is empty")
        void isEmpty() {
            assertTrue(stack.isEmpty());
        }

        @Test
        @DisplayName("throws EmptyStackException when popped")
        void throwsExceptionWhenPopped() {
            assertThrows(EmptyStackException.class, stack::pop);
        }

        @Test
        @DisplayName("throws EmptyStackException when peeked")
        void throwsExceptionWhenPeeked() {
            assertThrows(EmptyStackException.class, stack::peek);
        }

        @Nested
        @DisplayName("after pushing an element")
        class AfterPushing {

            String anElement = "an element";

            @BeforeEach
            void pushAnElement() {
                stack.push(anElement);
            }

            @Test
            @DisplayName("it is no longer empty")
            void isNotEmpty() {
                assertFalse(stack.isEmpty());
            }

            @Test
            @DisplayName("returns the element when popped and is empty")
            void returnElementWhenPopped() {
                assertEquals(anElement, stack.pop());
                assertTrue(stack.isEmpty());
            }

            @Test
            @DisplayName("returns the element when peeked but remains not empty")
            void returnElementWhenPeeked() {
                assertEquals(anElement, stack.peek());
                assertFalse(stack.isEmpty());
            }
        }
    }
}
2.3. JUnit5原理
单独的JUnit5其实是难以使用的,通常IDE或者代码管理工具,比如IntelliJ IDEA, Eclipse, NetBeans, Visual Studio Code, Gradle, Maven都会对JUnit5进行集成,从而让测试对开发更友好.所以以IDEA+JUnit5为例,第一步其实是从IDEA内部插件代码开始的.
- 触发测试进入插件源码,com.intellij.rt.junit.JUnitStarter::main
- IDEA构造DefaultDiscoveryRequest对象传入org.junit.platform.launcher.core::execute
/**
 * {@code DefaultDiscoveryRequest} is the default implementation of the
 * {@link EngineDiscoveryRequest} and {@link LauncherDiscoveryRequest} APIs.
 *
 * @since 1.0
 */
final class DefaultDiscoveryRequest implements LauncherDiscoveryRequest {

  // Selectors provided to the engines to be used for discovering tests
  private final List<DiscoverySelector> selectors;

  // Discovery filters are handed through to all engines to be applied during discovery.
  private final List<DiscoveryFilter<?>> discoveryFilters;

  }
-
解析测试用例生成测试计划
-

-
选择具体的测试引擎执行用例,以JupiterTestEngine为例,会构造JupiterEngineDescriptor
-

-
生成NodeTeskTask然后交给ExecutorService去执行(反射调用具体方法)
- 实际执行时会根据注解先去找实现的扩展类,比如启动Spring时的SpringExtension、Mock依赖的 MockitoExtension
3. Mockito使用与原理
3.1. 常用注解
3.1.1. 介绍
| Annotation | 描述 |
|---|---|
| @Mock | @Mock修饰的对象都是null,用到的每个方法都需要打桩模拟执行结果: Mockito.when().thenReturn() |
| @Spy | @Spy的对象会被无参实例化,在需要的时候可以打桩模拟执行结果: Mockito.doReturn().when() |
| @MockBean | 启动Spring容器,替换Spring原本加载的Bean,但是默认对象没有行为 |
| @SpyBean | 启动Spring容器,替换Spring原本加载的Bean,对象拥有默认行为 |
| @InjectMocks | 注入mock代理对象;必须修饰实现类,修饰接口会报错 |
| @Captor | 配合verify在方法调用后使用,捕获调用时的参数值 |
其他说明:
-
使用
@Spy的前提是对象可以被使用无参构造器初始化,因为需要得到一个空对象然后来执行它的方法. -
@Spy和@InjectMocks可以搭配使用,从而允许验证当前Spy对象中被mock的属性的行为,某些情况下适合在controller/service/dao分的service特别单薄时,在controller层对dao层方法中的行为进行验证,但必须注意这违反了单一职责原则(SRP原则) @Spy修饰接口不会报错,不过因为接口没有实现逻辑,所以不打桩模拟的时候,接口方法永远返回null。
@Spy 与 @Mock 测试案例:
    @Test
    public void whenCreateMock_thenCreated() {
        List mockedList = Mockito.mock(ArrayList.class);

        mockedList.add("one");
        Mockito.verify(mockedList).add("one");

        assertEquals(0, mockedList.size());
    }

    @Test
    public void whenCreateSpy_thenCreate() {
        List spyList = Mockito.spy(new ArrayList());

        spyList.add("one");
        Mockito.verify(spyList).add("one");

        assertEquals(1, spyList.size());
    }
3.1.2. 使用建议
3.1.2.1. 注解常用实践
- 一般来说,
@Spy修饰实现类、@InjectMocks修饰需要mock属性的实现类、@Mock修饰接口 - 默认使用
@Spy或@SpyBean,有需要打桩模拟返回结果的情况可以自定义模拟返回结果,尽可能的覆盖更多的代码逻辑 - 对无法直接实例化的三方依赖,比如下游接口、Redis等使用
@Mock;没有Mock到的依赖会NPE,逐个Mock即可 -
检查
void方法的执行情况可以使用verify/times校验调用次数和@Captor检查调用参数来进行行为验证 -
正如前言中提到的,使用这种测试框架最麻烦的在于真实生产代码中测试用例中复杂对象的构造
-
链路录制工具可以帮助生成请求与返回结构体,比如使用AOP拦截RPC请求得到入参和出参
3.1.2.2. Mockito Patterns:
When/Then: when(yourMethod()).thenReturn(x);
Do/When: doReturn(x).when(yourMock.fizzBuzz());
Verify/Do: verify(yourMethod()).doThrow(SomeException.class);
其中when/then以及doxxx/when相似度很高,很多人会疑惑用哪个.
官方推荐优先使用When/Then,因为可以保证返回的类型是符合预期的,并且也更可读.但当不需要执行实际的方法的时候,应该用Do/When,比如:
- mock
void方法时,使用doNothing/when(不执行when中的方法)
Object o = mock(Object.class);
doNothing().when(o).notify();
- spy对象的时候
List list = new LinkedList();
List spy = spy(list);

//Impossible: real method is called so spy.get(0) throws IndexOutOfBoundsException (the list is yet empty)
when(spy.get(0)).thenReturn("foo");

//You have to use doReturn() for stubbing
doReturn("foo").when(spy).get(0);
- 连续对调用方法打桩(Stub)1
值得一提的是,连续打桩方法直接写是反直觉的:
// 这个和直觉不一样!这个调用的时候只会返回"world"
when(o.toString()).thenReturn("Hello");
when(o.toString()).thenReturn("World");

// 下面都可以第一次返回"Hello",第二次返回"World"
// 第一种方式
when(o.toString()).thenReturn("Hello").thenReturn("World");
// 第二种方式
when(o.toString()).thenReturn("Hello", "World");
// 第三种方式
doReturn("Hello").when(o).toString();
doReturn("World").when(o).toString();
像上面这种后半部分的连续方法调用使用when/then或do/when都是可以的,但还有一种只能用后者,即前一次调用指定了要返回异常,后面又打算覆盖它的时候(虽然这样真的有点奇怪):
when(mock.foo())
.thenThrow(new RuntimeException());

// 后面想要直接覆盖上面的抛异常打桩
when(mock.foo()).whenReturn("I will be not returned");

// 必须用Do/When
doReturn("I will be Returned").when(mock).foo();
3.2. Mockito原理
比如when(mockObject.yourMethod()).thenReturn(x)这样的模式,看起来很连贯,是对yourMenthod()做了一个字面上"拦截"的封装,但明明when中实际传入的只是一个方法返回值而已,到底是怎么完成对yourMethod()这个方法进行打桩的呢?2
Mockito本质上就是在代理对象调用方法前,用stub的方式设置其返回值,然后在真实调用时,用代理对象返回起预设的返回值。
1. org.mockito.internal.creation.bytebuddy.BytecodeGenerator#mockClass 利用ByteBuddy中生成代理类
ByteBuddy使用示例:
Class<?> dynamicType = new ByteBuddy()
        .subclass(Object.class)
        .method(ElementMatchers.named("toString"))
        .intercept(FixedValue.value("Hello World!"))
        .make()
        .load(Object.class.getClassLoader(), ClassLoadingStrategy.Default.WRAPPER)
        .getLoaded();
StdOut.println(dynamicType.getSimpleName() + "  " + dynamicType.toString());
// 输出: Object$ByteBuddy$cmpHDO82   Hello World!
- 缓存代理类,多次请求返回同一个代理类
- 在执行方法调用时保存当前方法调用上下文到某个字段(org.mockito.internal.stubbing.InvocationContainerImpl#invocationForStubbing字段)
- 基于方法调用上下文信息返回
InterceptedInvocation对象来表示一次方法调用
// org.mockito.internal.creation.bytebuddy.MockMethodInterceptor.DispatcherDefaultingToRealMethod#interceptAbstract
public static Object interceptAbstract(@This Object mock, // 当前代理类
                                       @FieldValue("mockitoInterceptor") MockMethodInterceptor interceptor, // 方法拦截器
                                       @StubValue Object stubValue, // stub值,这里为null
                                       @Origin Method invokedMethod, // 当前调用方法
                                       @AllArguments Object[] arguments) /* 方法入参 */ throws Throwable {
    if (interceptor == null) {
        return stubValue;
    }
    return interceptor.doIntercept(
            mock,
            invokedMethod,
            arguments,
            RealMethod.IsIllegal.INSTANCE
    );
}
public static InterceptedInvocation createInvocation(Object mock, Method invokedMethod, Object[] arguments, RealMethod realMethod, MockCreationSettings settings, Location location) {
    return new InterceptedInvocation(
        new MockWeakReference<Object>(mock),
        createMockitoMethod(invokedMethod, settings),
        arguments,
        realMethod,
        location,
        SequenceNumber.next() // 每个InterceptedInvocation对象都有一个唯一序号
    );
}
- 当Mockito.when()再次调用时根据InterceptedInvocation对象查找对应的stub,如果找到则使用该stub返回特定值,否则返回默认值(int 会返回 0,布尔值返回 false,其他 type 会返回 null)
// // org.mockito.internal.handler.MockHandlerImpl#handle
// 根据invocation匹配对应的stub,匹配规则是 class相同+方法签名相同+入参匹配
StubbedInvocationMatcher stubbing = invocationContainer.findAnswerFor(invocation);
- stub中的值是thenReturn()中塞入的
public OngoingStubbing<T> thenReturn(T value) {
    return thenAnswer(new Returns(value));
}
public OngoingStubbing<T> thenAnswer(Answer<?> answer) {
    invocationContainer.addAnswer(answer);
    return new ConsecutiveStubbing<T>(invocationContainer);
}
public void addAnswer(Answer answer) {
     // 移除最近一次方法调用保存的invocation信息
    registeredInvocations.removeLast();
    //
    addAnswer(answer, false);
}
public StubbedInvocationMatcher addAnswer(Answer answer, boolean isConsecutive) {
    Invocation invocation = invocationForStubbing.getInvocation();
    mockingProgress().stubbingCompleted();
    if (answer instanceof ValidableAnswer) {
        ((ValidableAnswer) answer).validateFor(invocation);
    }
    synchronized (stubbed) {
        if (isConsecutive) {
            // 连续方式
            // 连续:针对同一个方法的多次调用,可以按照顺序自定义不同的返回值,如果调用次数超过了自定义返回值个数,默认后续以最后一个自定义返回值为准
            stubbed.getFirst().addAnswer(answer);
        } else {
            // 非连续
            stubbed.addFirst(new StubbedInvocationMatcher(invocationForStubbing, answer));
        }
        return stubbed.getFirst();
    }
}
-
使用Mockito进行单元测试【2】—— stub 和 高级特性](https://www.cnblogs.com/vvonline/p/4122991.html)) ↩